Editing with Harsh Light
I recently posted about how I shoot in harsh light. Think of this blog as a part-two to that post. I’m going to show you how I go about editing photos that are taken in that intense mid-day sun.
Let’s just start by honestly evaluating natural light photography. Golden hour happens twice a day: sunrise and sunset. Each lasts approximately an hour, give or take a little by time of year and location. But let’s say it’s a true hour. If this is our reality, then you get two hours of good photogenic lighting each day. If that day is an average twelve hours of daylight, then you get about 15% of your day in optimal lighting, and 85% of your day in harsh lighting.
I don’t know about you, but I don’t love photography for only two hours a day. I want to shoot throughout the day. But I also don’t want to be frustrated when I look at my photos or when I go to edit them. That’s why I wrote about how I shoot in harsh lighting, which honestly is what sets up how I edit. I’m going to edit this photo below, which was shot in the middle of the afternoon, and show you what I do to soften it and make it sit well with my other photos.
RAW, unedited
Part 1: Soften the Lighting
Since the middle of the day lighting is a bit much, we want to lower the contrast and soften the transitions between what’s bright and what’s dark.
I do this by using the following settings. I lower the contrast a bit, and then further flatten the image by decreasing the highlights and increasing the shadows. All of this removes contrast. I also bring the whites down, as it helps to soften the sky. I increase the blacks a bit as well to start fading them and make them not so deep.
Finally, I bring the mid-tones down on the curve. I also increase the blacks a bit as well to fade them. All of this is serving the purpose of decreasing the contrast and soften the lighting.
Part 2: Shift Colors
One of the things I typically do when editing harsh lighting is to shift colors more towards what I’d expect to see in better/softer lighting. For me, I like giving a bit of a golden-hour look even if it’s the middle of the day. The following color shifts are what I typically will do.
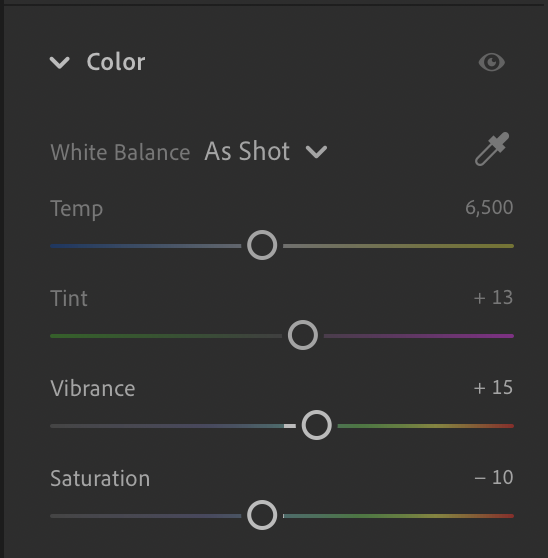
Starting with the white balance, I typically shoot the same white balance, 6500K for nearly everything outdoors. I quit using AUTO white balance a while ago, because I wanted more consistency and I felt the AWB was changing things too often. I try to leave the white balance alone most of the time. What you’ll see here though, is that I add some vibrancy and remove some saturation. I like this as a starting point.
Then I begin shifting hue, saturation, and luminance of the colors. I shift hue for more of a golden hour look. I use the saturation to remove intense colors that happen in harsh lighting. I use luminance as another tool for saturation (adding luminance desaturates, removing luminance increase saturation). The biggest things that affects the color of my photos is shifting red to orange, yellow to orange, and blue slightly to aqua.
All of these changes help bring the photo a little closer to the look I like for my pictures, even in the harshest lighting. I keep pushing the colors by adding a bit of color grading, and inject a bit of contrast back into the photo through the grading luminance setting. I like to add warmth in the shadows, a little greens in the midtones, and blue in the highlights to bring the sky back a little.
Part 3: Finishing Touches
At this point, we have effects and some masking left. I typically decrease clarity a bit to around -15, and decrease sharpening to around 25. I also like to add a little vignetting, around -5 or so. I like what slight vignetting does to a photo by drawing your eyes towards the center / subject.
The very last thing I do is through a little grain on the photo. A quick note about grain. The roughness will decrease contrast if you push it, as will the size. I like a mid-sized grain, around 30-50, with roughness around 50. Then I slide the amount to my liking. For mid-day lightning like this, I typically keep it on the lesser side since I’ve decreased the contrast so much earlier. I love how grain adds uniformity and helps light transition across the image.
The final thing I do is to add a slight gradient at the bottom and decrease exposure. This will darken the bottom shadows and draw your eyes up into the center of the image. It also adds some contrast back in, but in a place contrast doesn’t matter too much. This gradient makes a big difference, in my opinion.
The Final Image
At this point, the above settings have turned our original image in harsh lighting into this, which is much more aesthetically pleasing and softer. Original RAW file underneath as well, so you can compare.
Final image, edited
I think it’s important to shoot anytime you want, not just in optimal lighting. This is especially true with travel photography, as you don’t always have the luxury of waiting around for perfect lighting in every place you visit. Learning your best approach to shooting and editing in harsh lighting will give you confidence to happily shoot even in intense light. I would love to hear your thoughts on this, so be sure to comment and let me know what you think.


